In recent years, AirPods can be said to be one of the more and more iPhone users must buy peripherals. In fact, the actual prices of AirPods or AirPods Pro currently sold in Apple authorized dealers and other channels are no longer as high as the original prices.
Coupled with the previous launch of AirPods Pro, its active noise reduction function can meet daily commuting and other occasions that need to be immersed in personal audio and video entertainment, and it also makes more users more willing to start AirPods headsets.
However, some people are still not used to the sound quality of AirPods, but they don’t know how to adjust it to make the listening sound more satisfying to their listening habits.
This time I will also share with you some tips on how to make AirPods improve the sound quality and clearer sound. Perhaps you will have a new understanding of AirPods after you set it up.

At the end of April, Apple finally pushed the firmware update of AirPods 2 and AirPods Pro version 3E751.
But every time Apple pushes updates for a long time, most users are not concerned about whether any problems have been corrected?
It’s whether the sound quality and noise reduction effect of listening are better. After all, if you can continue to improve the sound quality after buying headphones, it is what the majority of AirPods users are looking forward to.
1.How to make AirPods improve the sound quality?
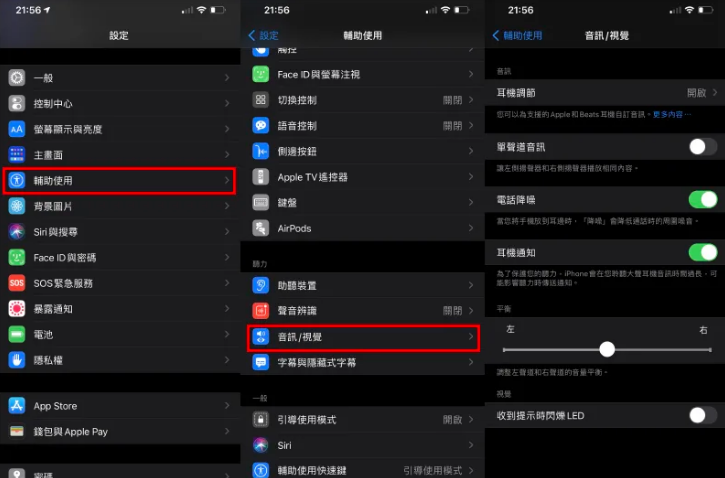
Open the “Settings” app on your iOS device and select the “Accessibility” function, then click the “Audio/Visual” option under the listening field


2.Headphone audio customization
Everyone has different preferences for listening to earphones. If you want to create earphone sounds that are more in line with your preferences, you can choose the “custom audio settings” function.
The custom audio function will adjust settings that are more suitable for personal preferences for several headset usage scenarios such as phone calls, movies and music, audiograms and transparent modes.
In order to make the setting results more consistent, before starting, it is recommended that you first find a quiet environment and then click “Continue” to start the setting

The custom audio settings will give the user a sequence of listening to the three sound comparisons. Users only need to choose “Version 1” or “Version 2” according to their preferences.
Then the system will slightly enhance the flat and horizontal tone according to the user’s choice, and the user only needs to click on “custom” or “standard” to listen to it.
Then if you are using AirPods Pro or AirPods Max with “transparency mode”, you can also adjust the custom transparency mode in advance
If you feel that the custom audio setting steps are too cumbersome, or you may change your listening preferences from time to time.
Then you can also directly click the audio at the bottom of the “Headphone Audio” page to adjust directly. Before adjusting the settings, don’t forget to click the “Play Sample” below as a trial comparison.
“Balanced Tone” will enhance a series of frequency bands, “Sound Range” will enhance the mid-range, and “Brightness” will enhance the high-frequency.


